Showing posts with label sewing. Show all posts

5.11.2012

Make Your Own Dolls!


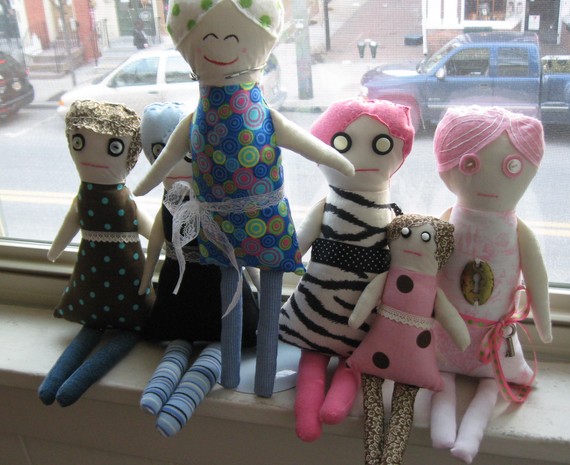
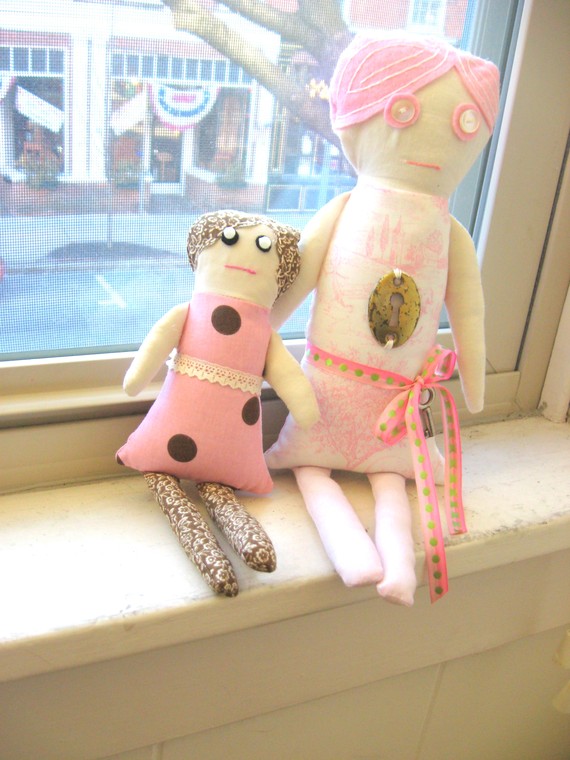
I love making rag dolls.  There are so many options on how to personalize them:

  • You can customize the face:  paint it, embroider it, make it a zombie. 
  • You can customize the clothes:  different fabrics, use your old clothes, make jeans for them, etc.
  • You can customize the shape:  straight body, triangle body, paints with shirt, dress, skirt, etc. etc. etc.!
  • You can customize the size:  make 'em big, make 'em mini, or make 'em somewhere in between!

Really, that's just the beginning of the options!  

Once you know how to make one, you can really broaden and do whatever your heart desires!

And how do you learn to make a doll?  

Design-a-Doll Digital Program!  It's just $15 in my Craftsy Pattern Store.  Purchase it now for instant download and get started right away!  It comes with a pattern, but I also show you how to design your own pattern!

If you prefer, I also have a Design-a-Doll Boy Digital Program for just $15.

Make a doll to give away and then make one to keep.  Everyone loves them!


5.03.2012

What Mom Wants for Mother's Day + Tutorial Sale


Have you ever felt the joy of giving your mom a handmade gift?

Maybe you made her a card when you were young.  Or a handprint (they were really popular when I was a kid.)  Maybe even a macaroni necklace that your mom wore all Mother’s Day just because you made it for her.

The joy is really 2-fold when making a handmade gift.

1.  First, there is a joy and sense of empowerment when you make the gift.  There is something about making art or craft that you cannot get anywhere else.  The world drops away and you are entirely focused on your project.  You forget about your worries - work, financial, relationships, or whatever your worry is about.  You find peace and serenity, even if it’s just for a few moments.

2.  Second, there is a joy when you present the gift.  You feel the joy as your mom opens your gift.  She feels the joy when she sees the magnificant thing you have made for her.  She deeply will feel the love that you put into the gift, and she knows that you have made it just for her.  You have taken your time and energy, your creativity and love to create this one-of-a-kind present for her. 

There is nothing like that joy, that satisfaction and empowerment.

You have come so far since the macaroni necklace, baby!  If you don’t think you have, I can teach you.  Step-by-step.  In full color photos.  Plus you get my help via email if you get stuck.

You can customize your gift to your mom’s favorite color.  In my latest tutorial you can even add photos!  I can tell you from experience, your mom will adore that!  She might even cry!

I’m not going to say it will be super easy, but you can learn and I am here to help you.  Step-by-step.  (And, maybe it will be easy...) 


About my tutorials:

My tutorials are very detail oriented.  When I write them, I assume you know nothing about how to do whatever the project is.  (One exception:  sewing tutorials.  I assume that you can at least sew in a straight line.  You by no means need to be a master seamtress, or anything close.  You can just be starting!)

You get step-by-step instructions with close up, clear photos.  I have seen other tutorials and patterns, and my photos are much clearer.  Sometimes it seems like the person missed a step - mine don’t.  You get stuck anyway?  Don’t panic, just email me and I’ll help you.

I have 18 different tutorials for sale in my Craftsy Pattern Shop.

Once you make a payment, you have instant access to download the pattern.


AS A BONUS

May 4, 2012 - May 12, 2012

As a special treat, and in honor of my mother, Kathy Burkhart, without whom I would have never found the joy of crafty, I’m having a tutorial sale!

BUY ONE, GET ONE FREE
Free tutorial is of equal or lesser value.

HOW IT WORKS:

Head over to my Craftsy Pattern Store and peruse your options.  Find 2 that you want to try.  Purchase the more expensive of the 2.

Send me an email with the name of the 2nd one you would like.

Once I receive your payment confirmation, I’ll email you the second pattern! 


CRAFTSY:

You do need to sign up for Craftsy to make a purchase.  It’s easy.   After you sign up, all of the patterns you purchase will be in “Your Account” under “My Pattern Library.”  (Your free pattern I emailed you will not be there.  It will be in your email and wherever you decide to download it.)

3.08.2012

Dotee Doll I Made

Since my swap partner has received this, it's safe to share photos of a recent Dotee Doll I sent out for a swap.  (On Swap-Bot)

This is my version of a Zombie Dotee.  The theme of the swap was to pick a favorite color from your partner's profile on swap-bot.  One color she mentioned was silver.  She also mentioned she liked (among other things) horror movies,  zombies and Edgar Allan Poe. 

So I made her a zombie dotee doll, and I attached a game tile piece pendant I made with a Raven and the word "Nevermore" on it.

I love how it turned out and I'm thrilled that my swap partner did, too!

If you are interested in learning how to make your own dotee doll (and I even give you some embroidery stitches) sign up for my tutorial newsletter and you'll get a link to download the tutorial once you confirm!

And then you can head on over to Swap-Bot and sign up for a swap!  It's so much fun!


Subscribe to our mailing list

* indicates required

Email Format

2.22.2012

New Digital Workshop Available: Design - a - Doll Boy


This is the boy version of my Design-a-Doll Workshop. I had made only girl dolls until one day my nephew asked me to make him a boy zombie doll. I made it to look like him and he loved it. (And even noticed that the doll looked like him!)

This tutorial is so much more than a tutorial, which is why I have called it a "workshop."

You'll learn how to make a rag doll - from designing it to sewing it. I also teach you how to embroider the face, make my version of a zombie doll or do a painted face.

If you're not up for designing your own doll, I've included a pattern for the doll, too.

These dolls are so addicting to make!

The list of materials seems sort of long, but you probably have most of the materials already. I like to use up old worn clothes. I especially love to make the boy dolls with old jeans for their pants.

Save memories by using your kids' favorite clothes or blankets and making them into a doll. Or remember a loved one who has passed on.

Just $15 in my Craftsy Pattern Store.  Pay and you can instantly download!

2.10.2011

Old Jeans - New Pillow Tutorial

Old Jeans - New Pillow Tutorial

I have probably mentioned this before - I Love Denim!  It's sturdy and rugged and matches everything!  

This tutorial will help you reuse jeans that are worn out or your kids grew out of and make it into something awesome!

This pillow looks impressive, but it's really simple and easy to put together.

Tools Needed:

Sewing machine
Scissors
Needle

Supplies Needed:

Old jeans in 2 different shades
Thread to match the jeans
Polyester fiberfill (or other stuffing for your pillow)

Step #1

Go through your old worn out jean collection (lol...I might be the only one with that sort of collection!), or get your family and friends to donate their old jeans to you.

Pick out 2 different shades of jeans.

Step #2

Decide how large you would like your pillow.  And cut strips of denim from your jeans to make enough to make that size pillow.

My pillow is smallish - about 12" x 10".  So I cut my strips 1 1/2" wide and 12" long.

Cut an even number of strips.  (I didn't, learn from my mistake.)

Step #3

Cut out the back denim blocks.  Cut half of the back in 1 shade and the other half in the other shade.  Then cut those pieces.  I didn't make the second cut in half, so that there were 2 larger blocks and 2 smaller blocks.  (See below)

Step #4

Sew the larger pieces to the smaller pieces and then sew the 2 halves together forming the back of the pillow.

Step #5

Cut your long strips into different lengths.  Cut 2 strips (1 of each shade) at a time.  Cut each pair in the same lengths and then arrange them.  Then move to the next 2 and so on.  

I sort of messed this up at the end because I didn't use an even number of strips, so my last strip is just solid.  


Step #6

Sew dark shade of denim to the lighter shade of denim into long strips.

Step #7

Sew the strips together.

Step #8

Put the right sides of the front and back together.  Sew around the edges, leaving a opening big enough to stuff your pillow.


Step #9

Turn the pillow right-side out.  Make sure you push out the corners.


 Step #10

If you haven't ironed - iron your pillow! 

Then stuff your pillow.  For a firmer pillow, use more poly fiberfill; for softer pillow, use less.


Step #11

Sew your pillow closed.  Fold in the edges.  Pull the needle and thread from the inside and them sew it up.

Step #12

Enjoy your pillow!!

General Tips:

I was trying to get photos of each step before the sun went down, so I didn't iron at the beginning or along the way.  You should definitely iron along the way while you are making this pillow.

You can really use any design you want for this pillow - you don't necessarily need to make strips or blocks.  Obviously straight lines are easier to sew.

Have fun!

I love this look so much, that I'm thinking about making a skirt with the same strips!  If I do, I'll be sure to share!

8.18.2009

Tuesday Tip for Greener Living

While I was cruising around Craftig yesterday, I found this tutorial for making an Eco-Friendly Drawstring Produce Bag by Indie House. How often do we use the plastic bags in the produce isle just to put all of our groceries in canvas bags? This is a great way to save even more bags! And in very super-cute way!