Showing posts with label tutorials. Show all posts

6.14.2012

Changes to this Blog + New Website. Like my Tutorials? Please read this!


I wanted to let you know that there would be a few changes happening around here. 


I have started a new website for everything tutorial related.  There's a brand new tutorial over there:  Wire Wrapped Skeleton Key Headband Tutorial.


Tutorial website:  KimberlieKohler.com

Another change:  I'm married and my name is now Kimberlie (Burkhart) Kohler!

There is a new Emerging Creatively Tutorials Facebook Page (it's VERY new with no information, but don't worry, that will change!)

The B.B. Bellezza Facebook page for my jewelry updates.


My Twitter account (now @BBBellezza) will be switching to the name Kimberlie Kohler soon.  I will include tweets about everything I’m doing including both new jewelry and tutorials.  It’s me, lol, so it’s whatever is happening in my life at any given moment.


I already have 2 separate newsletters:


For Handcrafted Jewelry, B.B. Bellezza


So, make sure that if you are interested in Tutorials, to make the switch over to the new website so you keep getting great information.  And if you're interested in my handcrafted jewelry, stay right where you are!  If you are interested in recycling tips and ideas, you'll find them in both blogs depending on the information.  (If they are tutorial related, they'll be at KimberlieKohler.com)

Also - I'm still working on the Kimberlie Kohler website, so it's not so beautiful yet and there isn't a simple button to click to follow, but if you sign up for my email newsletter, I'll make sure that you you get updates!  (I'll be changing the look somewhat of this blog, too.)


If you are interested in all I do, sign up for both newsletters and follow both blogs!  :)


If you are confused, let me know in the comments below and I’ll try to un-confuse you! 


Also note:


Everything that I have posted thus far on this blog will remain here, and all my posts up to this point have also been transferred to the new website. 


From this point on, however, posts will be in their perspective websites.

5.10.2012

Painted Scrabble Tile Pendants


I've been making Scrabble Tile Pendants for a while now.  I use different papers, photographs and tiny prints of artists' work to make them. 


Every so often someone will ask me if I painted the pendant.  Then I would explain that it is a process with paper.  But sometimes I wondered how painting them would work.  


Now, I'm not much of a painter.  I love to paint, but it's not really my forte.  But, for a special occasion, and lacking just the right paper, I tried painting a pendant.


Above is what I came up with.  I like the simplicity and I love trees.  I created exactly what I wanted.


Once you start making scrabble tile pendants, you start to realize you can make other things with your completed pendants, too.  Like earrings (there's a special bail for that), rings, bracelets or pins.


I also made this tie tack.


Do you want to learn how to make Painted Scrabble Tile Pendants of your own?  I used acrylic paints and then followed my Scrabble Tile Pendant Tutorial, and left out the parts using paper.


You can learn a new skill and make hundreds - thousands, even - of wonderful pieces of jewelry.  You can sell them if you want or give them as personal gifts, or make them for yourself!


Scrabble Tile Pendant Tutorial, just $5

5.04.2012

Tutorials BOGO Sale is Now On!


May 4, 2012 - May 12, 2012

In honor of my mother, Kathy Burkhart, without whom I would have never found the joy of crafty, I’m having a tutorial sale!

BUY ONE, GET ONE FREE
Free tutorial is of equal or lesser value.

HOW IT WORKS:

Head over to my Craftsy Pattern Store and peruse your options.  Find 2 that you want to try.  Purchase the more expensive of the 2.

Send me an email with the name of the 2nd one you would like.

Once I receive your payment confirmation, I’ll email you the second pattern! 


CRAFTSY:

You do need to sign up for Craftsy to make a purchase.  It’s easy.   After you sign up, all of the patterns you purchase will be in “Your Account” under “My Pattern Library.”  (Your free pattern I emailed you will not be there.  It will be in your email and wherever you decide to download it.)

5.03.2012

What Mom Wants for Mother's Day + Tutorial Sale


Have you ever felt the joy of giving your mom a handmade gift?

Maybe you made her a card when you were young.  Or a handprint (they were really popular when I was a kid.)  Maybe even a macaroni necklace that your mom wore all Mother’s Day just because you made it for her.

The joy is really 2-fold when making a handmade gift.

1.  First, there is a joy and sense of empowerment when you make the gift.  There is something about making art or craft that you cannot get anywhere else.  The world drops away and you are entirely focused on your project.  You forget about your worries - work, financial, relationships, or whatever your worry is about.  You find peace and serenity, even if it’s just for a few moments.

2.  Second, there is a joy when you present the gift.  You feel the joy as your mom opens your gift.  She feels the joy when she sees the magnificant thing you have made for her.  She deeply will feel the love that you put into the gift, and she knows that you have made it just for her.  You have taken your time and energy, your creativity and love to create this one-of-a-kind present for her. 

There is nothing like that joy, that satisfaction and empowerment.

You have come so far since the macaroni necklace, baby!  If you don’t think you have, I can teach you.  Step-by-step.  In full color photos.  Plus you get my help via email if you get stuck.

You can customize your gift to your mom’s favorite color.  In my latest tutorial you can even add photos!  I can tell you from experience, your mom will adore that!  She might even cry!

I’m not going to say it will be super easy, but you can learn and I am here to help you.  Step-by-step.  (And, maybe it will be easy...) 


About my tutorials:

My tutorials are very detail oriented.  When I write them, I assume you know nothing about how to do whatever the project is.  (One exception:  sewing tutorials.  I assume that you can at least sew in a straight line.  You by no means need to be a master seamtress, or anything close.  You can just be starting!)

You get step-by-step instructions with close up, clear photos.  I have seen other tutorials and patterns, and my photos are much clearer.  Sometimes it seems like the person missed a step - mine don’t.  You get stuck anyway?  Don’t panic, just email me and I’ll help you.

I have 18 different tutorials for sale in my Craftsy Pattern Shop.

Once you make a payment, you have instant access to download the pattern.


AS A BONUS

May 4, 2012 - May 12, 2012

As a special treat, and in honor of my mother, Kathy Burkhart, without whom I would have never found the joy of crafty, I’m having a tutorial sale!

BUY ONE, GET ONE FREE
Free tutorial is of equal or lesser value.

HOW IT WORKS:

Head over to my Craftsy Pattern Store and peruse your options.  Find 2 that you want to try.  Purchase the more expensive of the 2.

Send me an email with the name of the 2nd one you would like.

Once I receive your payment confirmation, I’ll email you the second pattern! 


CRAFTSY:

You do need to sign up for Craftsy to make a purchase.  It’s easy.   After you sign up, all of the patterns you purchase will be in “Your Account” under “My Pattern Library.”  (Your free pattern I emailed you will not be there.  It will be in your email and wherever you decide to download it.)

4.24.2012

Learn How to Make Things! Tutorials!


I love Craftsy.  You want to make something?  Just search on Craftsy, find the tutorial, pay and you have it instantly.

I sell my tutorials on Craftsy, too!


What's great about my tutorials?

I have 2 main types of tutorials:  Digital Programs and Individual Tutorials. 


Digital Programs contain usually at least 4 different individual projects (many times more!), plus all the skills you need to make them.  They give you ideas for customizing and personalization and making each project more your own. 


Individual tutorials have 1 project and all the skills you need to make it.  I don't just tell you to "open a jump ring" here.  I give you photos and tell you exactly how to open the jump ring.  (There is a specific way and most beginners don't know that!)


Design-a-doll is one project, but I teach you how to design your own doll!!  You can use this tutorial over and over again to make lots of dolls!


  • You learn more than just how to make a project (or projects).  I teach you skills to be able to make it your own and come up with your own projects.
  • TONS of full color photos.  Big photos with details! 
  • Detailed instructions.  I teach you like you know nothing.  (Except for anything involving sewing.  With the doll tutorials and cuff tutorials, I assume you know how to sew at least in a straight line.)
  • You can email me questions!  I want you to succeed.  I'm just an email away! 
  • Bonus:  I don't mind if you sell the products you make from my tutorials!
To see all of my current digital programs and tutorials, check out my Craftsy Pattern Store.


3.28.2012

Altered Art Jewelry Digital Program Launch, Today!

I'm so excited to present my newest digital tutorial program:  Altered Art Jewelry.

It's a huge 50 pages and you'll learn:

The program contains 4 extremely instructive tutorials, including:
-How to make Altered Art Charm Jewelry (charm bracelet and how to make into a necklace),
-How to make Scrabble Tile Pendants,
-How to make Glass Tile Pendants,
-How to make Bottle Cap Pendants (in two ways), and
-How to make the cords to hang your pendants on.


Plus you'll learn how to make any project into a pin, magnet or ring and how to use other materials to make jewelry.

AND how to re-size photos for use in jewelry without having any fancy software!

Whew!

This tutorial contains the how to's of the most popular pieces I sell in my store and at craft shows.


I hate to pick favorites, but if I had to, this one would definitely be my favorite!!


To Purchase, head to the Altered Art Jewelry Digital Program for instant download.

3.27.2012

What is Altered Art Anyway?


Since I'm releasing the Altered Art Jewelry Digital Program this week, maybe it's a good idea to answer the question.....

What is Altered Art, Anyway?

Altered Art has been defined in many ways and I have come to realize that a lot of things can be considered “altered art.”

A basic definition is that it is using old items and “altering” them.  There really is no wrong way to do it.  Quite often new techniques are discovered by accident.  It’s the transformation of ordinary objects into pieces of art.

Generally, the item(s) will be entirely new or different after the altering.

Different techniques you can use to alter art are:
            Painting
            Collage
            Decoupage
            Embellishing
            Rusting
            Stamping
            Drawing on
            Sewing
            Gluing things together or on the item
            The possibilities are limitless.

You can really alter anything to make altered art.  Basically gather up your “junk” and start playing. 

Here are some examples to get you started:
  • Playing cards - make ATCs with these (or make a little book!  I will be sharing a project for this later this week)
  • Game pieces (scrabble, domino, poker chips, etc.).  They make excellent pendants for jewelry.
  • Record albums - use the covers to make purses or other art, melt the albums themselves into bowls.
  • Bamboo tiles
  • Books
  • Boxes (Cigar boxes)
  • CDs and DVDs
  • Glass bottles 
  • Jigsaw puzzle pieces
  • Luggage labels
  • Matchboxes
  • Microscope slides
  • Photo frames
  • Tins
  • Bingo cards
  • Dolls
  • Paper bags (to make books!)
  • Pennies and other coins                                                                                     
My favorite altered art, of course, is Altered Art Jewelry!  Scrabble tiles, dominoes, Rumikub tiles, bottle caps, etc.!  I have had so much fun (and have been profitable!) selling my Altered Art Jewelry designs.  

Wednesday is your chance to get my secrets!  I'll be releasing my brand new Altered Art Jewelry Digital Program.  To learn more about the release (and get entered for the giveaway) read here.  If you think you’d like to give altered art jewelry a try, this is the digital program for you!  It’s seriously thorough and you can even email me if you get stuck!!  

Make sure to sign up for your chance to win a free copy of the new program and a kit to make the projects!

3.09.2012

What to do with buttons

I LOVE buttons!  I bet a lot of you do, too!

Here are some links to buttons related posts:


Stacked Button Necklace Tutorial


Use it for the middle of a Fabric Flower

Use it for an accent on a Decoupage Jar (Video Tutorial)


Button Rings ( I sell these at my booth at BUiLDiNG CHARACTER in Lancaster, PA.  If you want to learn to make them, I'm working on a digital wire wrapping workshop!  Make sure to join my tutorial newsletter to know when it's available!)

2.28.2012

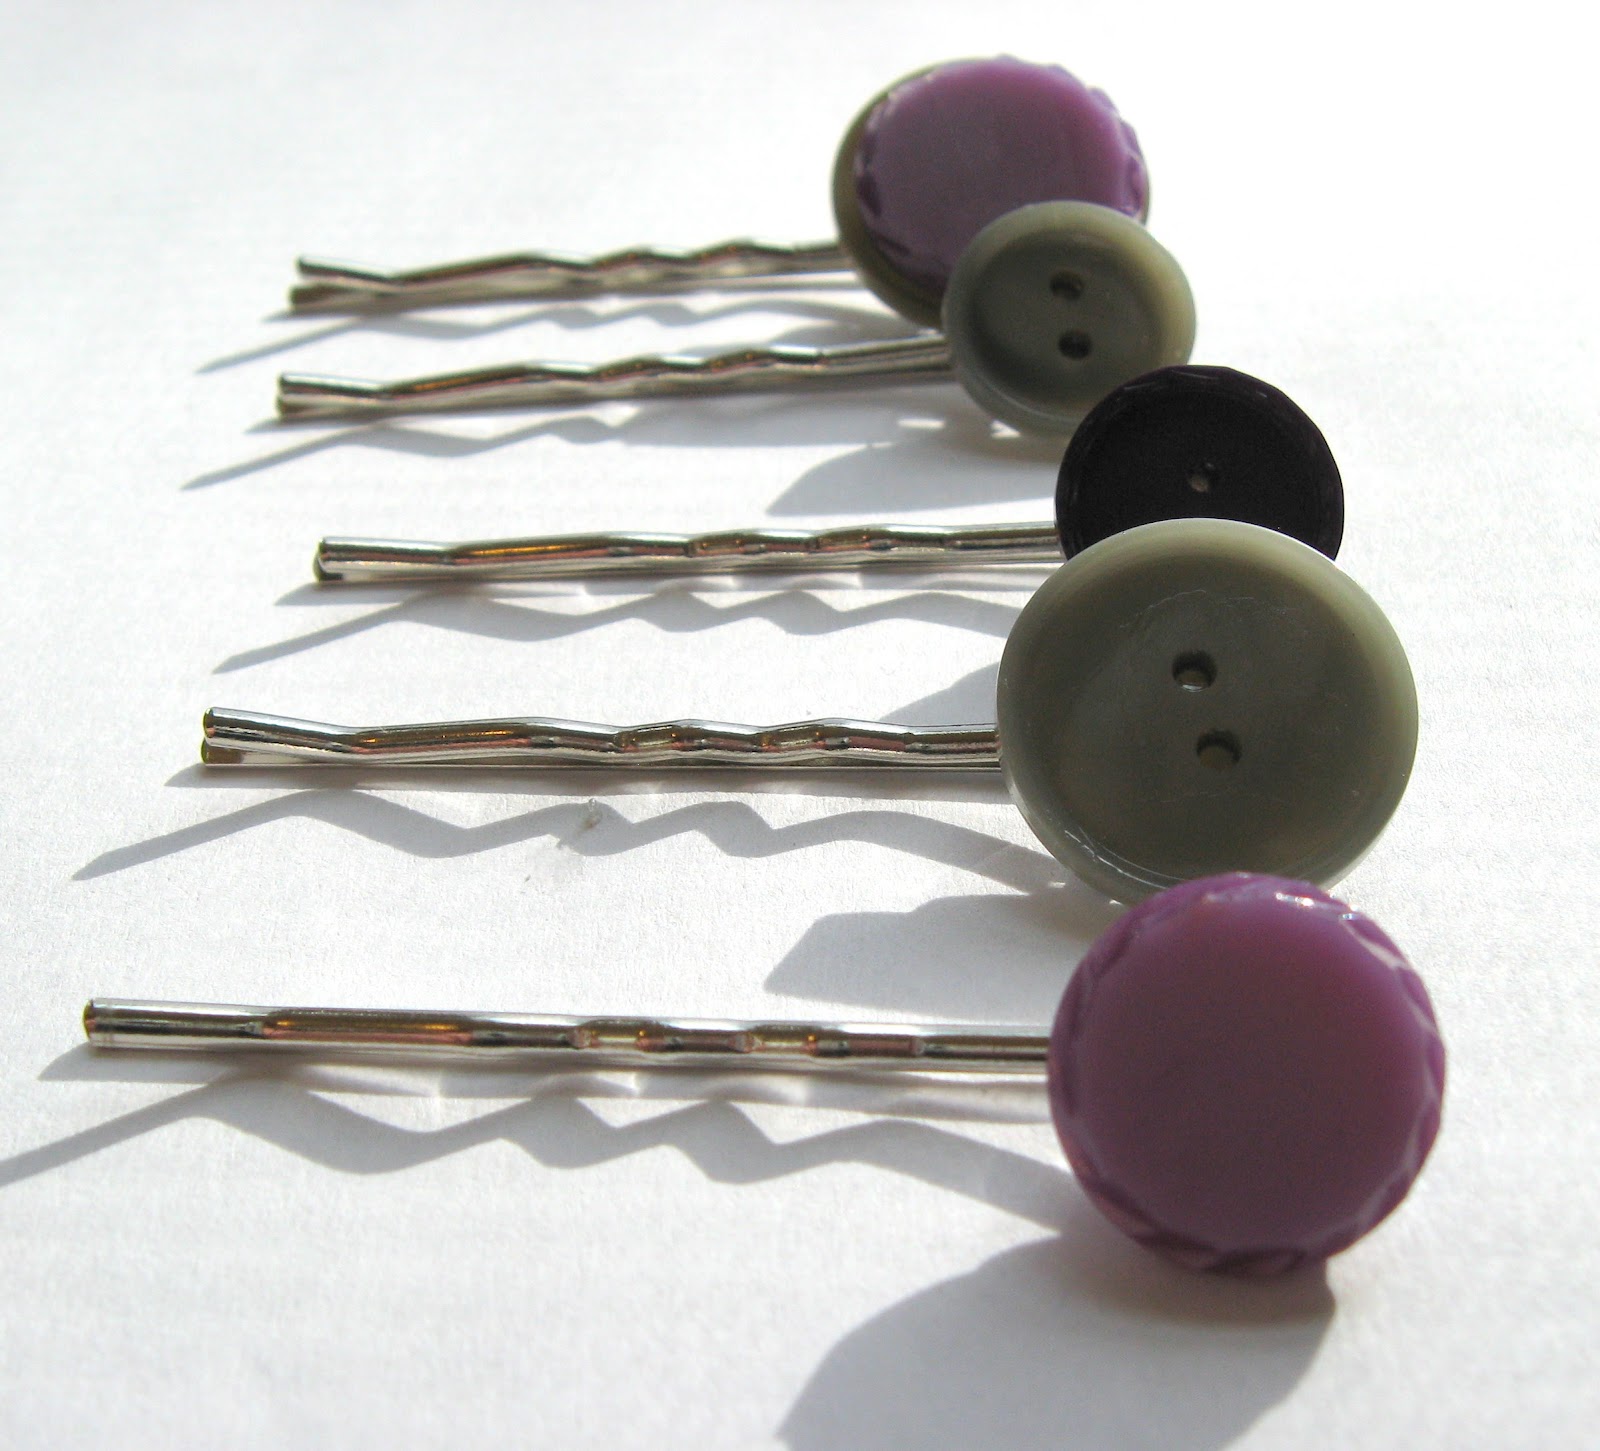
TUtorial: Button Hair Pins

It's so easy - with the right glue! - to make these adorable hair pins!

Tools and Supplies:
  • Buttons of your choice
  • Hair pins with a little round pad on them (I got mine at Hobby Lobby, you can find them online, too)
  • E6000 (find this at any craft store)
  • Toothpicks
Step #1
If you are making a stacked button hair pin (I did for this one) add glue to one button and put it on the other button.

If you are just using one button, skip to the next step.

(notice the string of glue in the photo - I should have wiped that off!  You can also pull it off after it dries, so don't worry!)

Step #2

Add glue to the pad of the hair pin.

Step #3
Place the hair pin onto the back of the button.

Step #4

Allow to dry at least overnight before wearing.

Step #5
Enjoy your new hair pins!

2.14.2012

How to Make....

I'm a Craftsy Designer


As I am sure you have noticed, I have been focusing on "How Tos" lately.  I love making different projects and I really love sharing instructions so you can learn how to, too. 

Recently Craftsy opened up their pattern store!  You can find all kinds of patterns, tutorials, etc. on it.  I have my own store there, too.

Craftsy is great because you have access to the tutorial immediately after buying.  You don't have to wait for me to send an email with the tutorial!

My tutorials are more like digital workshops.  You learn everything you need to know as if you were a beginner.  My "How to Make Extraordinary Jewelry from Ordinary Objects" tutorial teaches you how to make hardware jewelry as if you have never made jewelry again.

Plus, you get several different patterns for different hardware jewelry designs, from earrings to bracelets to necklaces + inspiration for customization.

If you have any questions or get stuck, I'm only an email away!

My other digital workshops are similar.  The only difference is that the workshops involving sewing (Fabric Cuff Bracelet and Design-a-Doll), I do assume that you can at least sew in a straight line and around curves and corners. 

If you don't want a full out digital workshop, you can opt for my individual patterns, which just include one project.  For example, a pair of earrings, or one style of fabric cuff bracelet.

Terms of Use:

Please use the products you make from my tutorials in any way you want.  You can make things for gifts or even to sell!  If you end up teaching these in workshops in the future, I would appreciate that you don't share the tutorial with other people who want to teach, but ask them to purchase the tutorial from me. 

I would love to hear about you starting a new business with the skills you learned from my tutorials! 

Please do not share, copy, sell, or distribute any tutorial or any part of any tutorial, however.

Any questions about that, just let me know!

Upcoming

I have new tutorials planned for the entire year.  New doll tutorials will be coming out later this month.  I'm also working on an Altered Art Jewelry Workshop, Embroidery workshop + many more!  Plus a lot more free tutorials right here on the blog!

What do you want to learn how to do?


2.12.2012

New Tutorial Available: Lots of Buttons Fabric Cuff Bracelet


Make your own fabric cuff tutorial with Lots of Buttons!  

This is a great use of worn jeans!  You can use any fabric you wish.

You just need to be able to sew in a straight line.  I'll teach you everything else!

Great for people who have metal allergies and can't wear metal jewelry!

Pick it up for just $5 in my Craftsy Pattern Shop.

2.03.2012

Tutorials Now Available on Craftsy!

I'm a Craftsy Designer


I'm so excited to tell you about Craftsy!  If you love to create, Craftsy is the place for you.  You'll find tons of projects and classes to take whether your passion is sewing, crochet, embroidery, jewelry, etc., etc., etc..  And now you can also find patterns!! 

Soon all of my tutorials will be available on Craftsy, but there are a few there now.  There's even a couple for FREE!   

Just pay through paypal and instantly download the PDF file!  No waiting!

The new name for my tutorials store is Emerging Creatively and I am going by my married name (and no, the big day didn't happen yet, I figured we were close enough and I'll have plenty of other places to change my name):  Kimberlie Kohler. 

I'm working on a new website, too!  I'll let you know when it's ready.  (It's not even close at the moment!!)

2.01.2012

New Tutorials! Fabric Flower Cuff Bracelet and Freestyle Sewing Cuff Braclet

I have a couple new tutorials available in my etsy shop!  First, the adorable Fabric Flower Cuff Bracelet tutorial.

and


These are both available in my etsy shop right now and just $5 each.

If you want them both plus 2 more and the Love Cuff Tutorial all in one, purchase the Basic Fabric Cuff Tutorial for just $15!

8.12.2009

Awesome New Website!

Only click if you are ready to be addicted!

Craftig (meaning Craft is good) is a social bookmarking site. Basically, people share links to projects. It's great because everything is all just organized there for you!

I just found it and haven't posted any links yet and I haven't gotten the complete hang of it yet, but it looks amazing and I wanted to share because I know a lot of you have some great tutorial and project links to share!