Showing posts with label tutorial. Show all posts

6.12.2012

Try a New Technique

{bracelet from my wedding}
I started making jewelry when I was a child. 


I don’t exactly remember how I got started. I do know that I have this pink unicorn purse/tiny duffle bag filled with beads. They were all just in there together mixed up. Plus there was stretch cord. 


I made bracelets mostly. In random rainbow colors. 


I got into other things and left the pink unicorn purse behind. 


Then one day, about 7 years ago I pulled out the purse again and started making jewelry again. 


Through the years I have tried new techniques. Sometimes I love the new technique, sometimes I hate it. If I love it, I keep doing it. If I hate it, I don’t do it again. I remember when I first tried wire-wrapping (one of my most favorite techniques now), I was all over the place. My wraps were a mess and I really didn’t know what I was doing. I started making rings, too. I just looked at what other people’s rings looked like and tried it in my own way. 


I did it. I figured it out. My wraps became more even and less a big mess. My designs stayed together and I did it! 


Sometimes trying something new can be intimidating. For me, making jewelry isn’t, but computer stuff is. Moving my blog over to Wordpress has been intimidating. I’m taking a class to learn the steps of how to do it, and I’m learning. 


Maybe wire-wrapping jewelry is like that for you. You’re not sure where to even start. That’s how I was with Wordpress. I am glad I found someone to hold my hand through the process. 


I’m happy to let you know that soon I can hold your hand through the process of learning to wire-wrap. I will soon be done with my latest digital program, Wire Wrapping for Beginners. I’m so very proud of this eBook and I can’t wait to get it into your hands! I will tell you more details later, but I am so excited about it! 


To make sure that you get the details about the eBook and when it's available (including an early bird special), make sure to subscribe to email updates!

  Sign up to get my free Dotee Doll Tutorial and Pattern! Get free tutorials and more!  Just sign up for the new Emerging Creatively Tutorials email updates!  
Subscribe to our mailing list
* indicates required
 
Email Format

6.02.2012

Cynthia Rag Doll


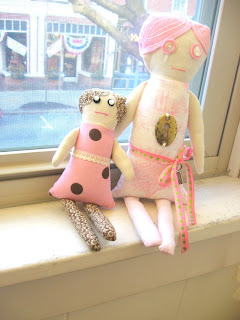
Learn to make this awesome zombie rag doll yourself, or buy Cynthia already finished in my etsy shop!

5.31.2012

Thank You Card Tutorial (Mixed Media)


When I was growing up (high school and into adulthood), I didn't think I had any artistic ability.  I didn't think I could draw or paint.  I took a jewelry making class in high school and dropped it within a week or two.  I wasn't "artistic;" I was "musical."  My identity in high school was based completely around my musical abilities.


I don't know or remember if someone told me I couldn't draw, or if it was self-imposed.  I tried and dropped various art classes.


I wanted to be able to draw and paint, but I "knew" I couldn't.


I started making jewelry (in my own way).  I taught myself to make the jewelry I wanted to make.  Now, no one tells me I can't or that I do it incorrectly.  In fact, many people support my jewelry-making by purchasing my pieces.  Very recently I have begun to try painting.  I bought a set of water colors and have tried.


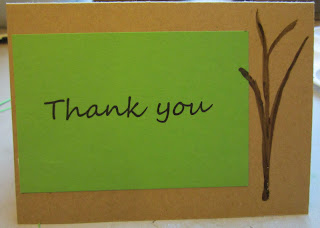
In fact, I have hand-painted trees on everything for my wedding:  invitations, signs, programs, lavender bags, thank you gifts and now thank you cards.  (that's a lot of trees!)


The lesson here is, don't doubt yourself or let anyone else doubt you.  If you want to draw, draw.  If you want to paint, paint.  If you want to make jewelry, do it!  If you want to sew, try it!  However you do it is perfect.  Do it for as long as you want and quit whenever you want.


I love to paint because I love the feel of the paintbrush.  I love seeing the paint as I put it down on paper.  For me, it's much more about the process.  I also loved how individualized each invitation, lavender bag (for the lavender toss) and each program was for my wedding.  I truly felt like I was giving each of my guests a mini piece of art.  I hope they felt the love I felt for them when I was painting each branch.


TUTORIAL:


To make these simple, rustic thank you cards, you'll need:


  • Card stock, or ready made blank cards
  • Envelopes
  • Card stock in a color (I used green because that was my wedding color)
  • Water colors
  • Glue dots, E-Z Squares or some other adhesive
  • Paint brush (I love my flat paint brush)
  • Paper cutter or scissors
Step #1


The cards I used were from A.C. Moore.  They were kraft, which I really loved the look of.  There are a whole variety of choices.


The cards I used had a crease.  Fold them along the crease.


If you are using card stock, decide how big you would like your cards (make sure they fit in your envelopes.) Cut and fold them.


Step #2


I made a template for the size of the card stock for the front of my cards.


Step #3


Next I printed "thank you" on my green card stock.  This wasn't scientific at all.  I simply made a Word document, played around with sizes and fonts.  Then I printed a sample and used the template I made in Step #2 to make sure I could cut them out to the size I wanted.   Then I printed it on the green card stock.


Step #4


Use the template to mark where to cut the card stock.  Again, nothing scientific, just eyeball it and make a couple marks.  As I made more of these, I just cut them without measuring with the template.

Step #5


Use your paper cutter or scissors to cut out your card stock.


Step #6


Add adhesive to the back of the card stock and add to the card.  Place it however you like.  I put mine to the side to leave room for painting.


Step #7


Then I used watercolors to paint a tree on the side.  My favorite paintbrush is my flat brush.  It's great for thin lines and for thick lines.  


Let the paint dry and write your thank you inside.

I love the simple look of these.  I painted similar trees on everything for our wedding, so this matches perfectly.  That's the great thing about making your own stuff:  you can make it anyway you want to match anything you want.  The possibilities are endless!


For more of my tutorials, please check out my Craftsy Pattern Store.  

5.11.2012

Make Your Own Dolls!


I love making rag dolls.  There are so many options on how to personalize them:

  • You can customize the face:  paint it, embroider it, make it a zombie. 
  • You can customize the clothes:  different fabrics, use your old clothes, make jeans for them, etc.
  • You can customize the shape:  straight body, triangle body, paints with shirt, dress, skirt, etc. etc. etc.!
  • You can customize the size:  make 'em big, make 'em mini, or make 'em somewhere in between!

Really, that's just the beginning of the options!  

Once you know how to make one, you can really broaden and do whatever your heart desires!

And how do you learn to make a doll?  

Design-a-Doll Digital Program!  It's just $15 in my Craftsy Pattern Store.  Purchase it now for instant download and get started right away!  It comes with a pattern, but I also show you how to design your own pattern!

If you prefer, I also have a Design-a-Doll Boy Digital Program for just $15.

Make a doll to give away and then make one to keep.  Everyone loves them!


5.05.2012

Flower Top Gift Box Tutorial

Imagine presenting a gift in this beautiful, unique box.  They will ooh and ahhh about it before they even open the gift!

Inspiration:  I recently was given a gift in a beautiful package.  I felt so special before I even opened it.  Someone took the time to make this gift look so lovely for me.

I hated to even open it, but it made the whole process even more special and lovely.  I felt even more like I had been given such a wonderful gift!


Materials:
2 pieces of card stock
Magazines
Button
Wire (any kind)
Flower Pattern
Scissors
Awl (or thumbtack or pin)
Bone folder or, as I use, big popsicle stick


Step #1


Rip 4 pages out of a magazine.  Then cut them in half.


Step #2


Print and cut out the Flower Pattern.  Then cut out 4 of the small flowers and 4 of the larger flowers.  I usually pin them onto the paper to hold it.  It does put holes in your paper, but you can't really see them.


Step #3


Use your awl to punch 2 holes in the middle of the flowers.  


(HINT:  If you don't have an awl, you can use a thumbtack or pin to poke holes.)


Step #4


Cut a piece of wire.


Step #5


Fold the wire in half and slide the button on.  The top of the button will go towards the curved part of the wire.


Step #6


Slide the magazine flowers onto the wire.  The smaller flowers will be closest to the button.  That is the top or front of the flower.

Step #7


Twist the wire once or twice.


Set the flower aside for now.  

Now we'll make the box.

Step #8


Grab one piece of card stock.  Fold it as shown in the 2nd photo (you're trying to create a perfect square.)


(HINT:  You can really use any paper here.  I have used magazines for this part, too, but they are little more flimsy.  I have used old file folders that the office I worked for threw out, too.  They are perfect.)


Step #9


Cut off the extra card stock.


Open the card stock back up.


Step #10


Fold in half diagonally.


Open the card stock back up.


Step #11


Fold in each corner to the middle fold.


Open card stock back up.


Step #12


Fold up each corner to the fold you just made.


Open back up.


Step #13


Fold each corner up to the closest fold.


Open card stock back up.


Step #14


Make cuts in the card stock.  I drew a line showing where to cut.  Cut on either side of 4 blocks and a triangle on opposite sides.


Step #15


Flip over the card stock.  Punch 2 holes in the middle with your awl (or a thumbtack or pin.)


Step #16


Grab the flower you made previously.


Push the wires of the flower through the holes.


Step #17


Twist the wire a few times.  Then cut the wire if you need to.  (Not too short, though!)


Step #18


Fold up the sides, parallel with the cuts you made, following the fold lines you made.


Do this for each side.


Step #19


The fold up the ends of the sides as shown in the photo.


Step #20


Fold the sides into a square.


Step #21


Fold in the other sides using the folds you already created.


Step #22


Use a bone folder (or popsicle stick if you're like me!) and go around all your folds.


Step #23


Use your awl or a pencil to curl up the top couple of levels of flower petals.


You're done with the lid!


Step #24


To make the bottom, follow the steps to make the box from above (minus the flower part).  You have to make the square a little smaller so it fits inside of the lid.  When you do the original fold before cutting the card stock, don't fold it all the way to the edge, instead fold it short.  Cut off the excess.  Follow steps 11, 12, 13, 14, 15, 19, 20, 21, 22 and 23.


Now your Flower Top Gift Box is ready to fill with a gift!!


Idea for customization:


Instead of the magazine flower, try a tissue paper flower on top.   Make the box first and then use my Flower Made From an Old Pattern Tutorial and put it on top at the end.


And what's better than a handmade gift?  Check out my Craftsy Pattern Store for some great tutorials you can make!  


May 4 - 12, 2012 I'm having a BOGO Tutorial Sale!  Buy one get one (of equal or lesser value).  Just pick out 2 tutorials from my Craftsy Pattern Store, purchase the more expensive on and email me the name of the one you would like for free.  Once I receive your payment, I'll email you the free tutorial!