When I was growing up (high school and into adulthood), I didn't think I had any artistic ability. I didn't think I could draw or paint. I took a jewelry making class in high school and dropped it within a week or two. I wasn't "artistic;" I was "musical." My identity in high school was based completely around my musical abilities.
I don't know or remember if someone told me I couldn't draw, or if it was self-imposed. I tried and dropped various art classes.
I wanted to be able to draw and paint, but I "knew" I couldn't.
I started making jewelry (in my own way). I taught myself to make the jewelry I wanted to make. Now, no one tells me I can't or that I do it incorrectly. In fact, many people support my jewelry-making by purchasing my pieces. Very recently I have begun to try painting. I bought a set of water colors and have tried.
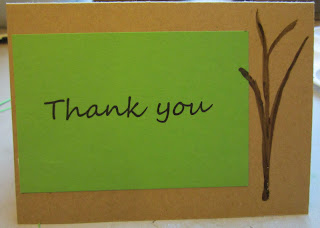
In fact, I have hand-painted trees on everything for my wedding: invitations, signs, programs, lavender bags, thank you gifts and now thank you cards. (that's a lot of trees!)
The lesson here is, don't doubt yourself or let anyone else doubt you. If you want to draw, draw. If you want to paint, paint. If you want to make jewelry, do it! If you want to sew, try it! However you do it is perfect. Do it for as long as you want and quit whenever you want.
I love to paint because I love the feel of the paintbrush. I love seeing the paint as I put it down on paper. For me, it's much more about the process. I also loved how individualized each invitation, lavender bag (for the lavender toss) and each program was for my wedding. I truly felt like I was giving each of my guests a mini piece of art. I hope they felt the love I felt for them when I was painting each branch.
TUTORIAL:
To make these simple, rustic thank you cards, you'll need:
- Card stock, or ready made blank cards
- Envelopes
- Card stock in a color (I used green because that was my wedding color)
- Water colors
- Glue dots, E-Z Squares or some other adhesive
- Paint brush (I love my flat paint brush)
- Paper cutter or scissors
Step #1
The cards I used were from A.C. Moore. They were kraft, which I really loved the look of. There are a whole variety of choices.
The cards I used had a crease. Fold them along the crease.
If you are using card stock, decide how big you would like your cards (make sure they fit in your envelopes.) Cut and fold them.
Step #2
I made a template for the size of the card stock for the front of my cards.
Step #3
Next I printed "thank you" on my green card stock. This wasn't scientific at all. I simply made a Word document, played around with sizes and fonts. Then I printed a sample and used the template I made in Step #2 to make sure I could cut them out to the size I wanted. Then I printed it on the green card stock.
Step #4
Use the template to mark where to cut the card stock. Again, nothing scientific, just eyeball it and make a couple marks. As I made more of these, I just cut them without measuring with the template.
Step #5
Step #6
Add adhesive to the back of the card stock and add to the card. Place it however you like. I put mine to the side to leave room for painting.
Step #7
Then I used watercolors to paint a tree on the side. My favorite paintbrush is my flat brush. It's great for thin lines and for thick lines.
Let the paint dry and write your thank you inside.
I love the simple look of these. I painted similar trees on everything for our wedding, so this matches perfectly. That's the great thing about making your own stuff: you can make it anyway you want to match anything you want. The possibilities are endless!
For more of my tutorials, please check out my Craftsy Pattern Store.


No comments:
Post a Comment